
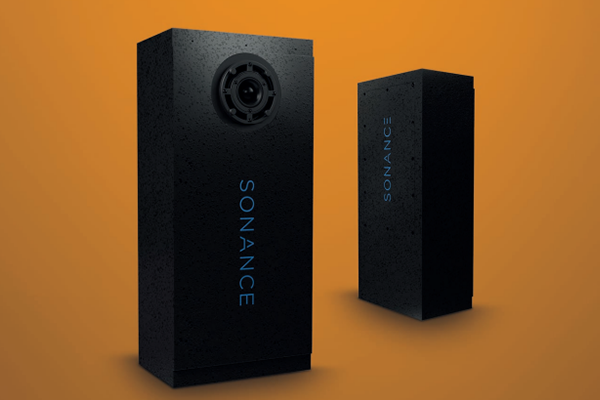
Sonance SA4-66 Small Aperture In-Ceiling Speaker
Combining aesthetics with quality sound is something not many speakers have been able to achieve. Mat Daley breaks down the latest solution from Sonance.
In custom AV installations, there is typically a trade-off between the performance and the aesthetic of products, particularly speakers. Being forever on the hunt for products able to satisfy both camps, this new speaker caught my eye immediately.
ADVERTISEMENT
This newly released SA4-66 small-aperture series speaker from Sonance is designed to deliver Sonance-quality, full-range sound from its tiny 100mm aperture, meaning you can keep both an interior designer and a discerning listener happy. Sounds too good to be true? Let’s check it out.
The overarching principle here is simple: Take a traditional 6.5” woofer, house it in a large, concealed in-ceiling enclosure and port it out through a tiny visible opening no larger than a typical downlight, just 4” or 102mm. In the porthole sits a separate 50mm ‘wide-bandwidth’ tweeter to handle mid and high frequencies, with the lower frequencies of the woofer passing around it.
By doing so, you keep the performance and bass extension of the larger woofer but reduce its visible impact to a tiny “aperture” no bigger than a typical downlight. Line these port holes up with the light fittings on your ceiling so they look like they belong, and voilà, big sound with a small aesthetic impact.
The SA4-66 comes as a complete install kit with all the installation accessories you need to get the job done, and comes with both a round and square grille.
There are also two styles of grille available, depending on what finish you are going for. Your first option is what they call their ‘Micro-Trim’, which is the more forgiving of the two options for the installer. Micro-Trim grilles have a small traditional bevel, which means they take up a little more real estate but can cover some not-so-perfect cutouts. The circular Micro-Trim grille is 117.4mm edge to edge, and the square version is the same at 117.4×117.4mm.
For the perfectionist, the flush grille option provides the best finish but requires the most skill to install. The end result is completely worth it in my opinion, and let’s face it, if the client or interior designer has requested or approved this speaker, it is for its finish, so charging some extra labour to give the best possible finish is par for the course. The flush grilles sit completely flush with the ceiling and are also slightly smaller due to their bevel-less design at just 102mm.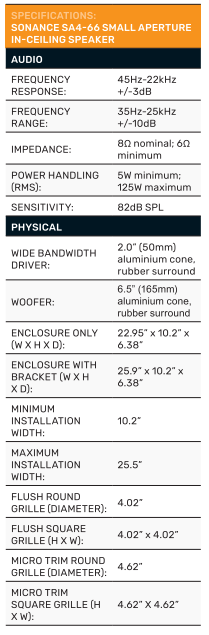
When it comes to installing the SA4-66, planning is critical. Close consultation with the interior designer or lighting designer in the very early stages of your project is obviously going to be key to success here.
Make sure they are aware of the grille size and number of grilles they need to account for when setting out the ceiling lights. They will also need to be aware of the size of the in-ceiling enclosure, as its size (658 x 258.5 x 162mm) means your speaker positioning is a lot less forgiving. You are also going to need to know where the ceiling joists sit, as the back box is going to mount between them. If you have access to the project’s CAD or Revit file, Sonance do provide .dxf files, which makes life easier.
The first stage of the install obviously needs to take place prior to sheeting, so let’s walk through what needs to happen. Assuming you have already run your speaker cable to this location (Sonance recommends 16AWG or thicker), first, you need to install temporary studs to the underside of your ceiling joists. This will create a temporary platform to help position the included alignment board by taking its weight, but also gives you a hard boundary, which will end up being the back side of the ceiling sheet. Then you need to attach the mounting brackets to the supplied alignment board/template and screw the entire assembly to the ceiling joists running parallel with them in the cavity to line up with your install position. The clever expandable mounting brackets allow the assembly to move side to side for perfect alignment between the joists and to help line up the port with a row of downlights.
At this point, if you are happy with the alignment, you can tighten the bracket screws and unscrew the alignment board to allow the speaker enclosure to be installed on top of the bracket and screwed in place. This is a good time to test your speaker before the plasterer starts.
Connecting to the standard spring terminals on the exterior of the speaker enclosure, you should first test that the woofer is working, then connect the tweeter module by pulling the pre-installed internal cable through the port hole and connecting to the back of the tweeter module. Click the tweeter module into the porthole and test.
All things going well, you should have a full-range signal and a perfectly placed small-aperture speaker. If everything checks out, it would be wise to disconnect the tweeter module and grille and store them off-site for safekeeping until fit off. You can then remove your temporary studs and do a double check to ensure the speaker enclosure is flush with the joists.
If your ceiling material is going to be thicker than 13mm, Sonance also provides a series of spacers that you can now install to match the thickness of your ceiling layer. Once this is matched, there is a placeholder to install to allow the plasterer to plaster up to and around your speaker opening.
Once the initial sheeting is done, you remove the placeholder, install the speaker trim and the dust cover for final sanding and painting. I would also be supplying the grilles to the painter to colour match them to the ceiling colour if it is anything other than white. Once the ceiling is painted, it’s time to simply remove your dust covers, reinstall the tweeter module and push in the grilles to the trim kit.
Yes, there are a lot more steps and coordination required compared to a standard set of in-ceilings, but nothing overly difficult, provided you plan and the result speaks for itself. Great sound quality and low-end extension without compromising on the room’s aesthetics.
Although the small-aperture speaker concept is not new, it has until now only been available under Sonance’s premium tier brand, James Loudspeaker, and by offering a more cost-effective version under the Sonance brand, it is now more feasible for more projects.
The James Loudspeaker range remains available to serve top-tier and marine projects, but by making some small changes like having a wooden enclosure rather than folded steel and completely redesigned drivers, the SA4-66 comes in at nearly half the price of the James equivalent at $3,150 (including GST).
Despite its lower price point, it is still a high-quality speaker as you would expect from Sonance. The build quality is great and Sonance have included everything you need to make the install as quick and easy as possible.
When it’s all said and done, all the extra planning and installation that goes into delivering a solution like this is only worthwhile if it still sounds good, right?
So, does it? The short answer is yes; it absolutely does.
The SA4-66, to my ear, is still a very natural, Sonance-esque sounding speaker. That is to say that it delivers both clarity and warmth in equal measure. I, of course, didn’t pull my ceiling apart and re-sheet to test these speakers, but even when pushed against my wall in a crude simulation, they performed impressively well.
It’s also fair to assume that once properly installed in a ceiling, they would pick up some additional boundary gain for some extra output and further improved performance overall. While it doesn’t deliver thumping bass or wouldn’t satisfy the ears of a discerning audiophile, it isn’t its place to do so.
Kept in context, the sound that you do get from the tiny visible ‘aperture’ is actually super impressive with all the sonic qualities of a great set of traditional in-ceilings and far, far better than any traditional 4” in-ceiling I’ve ever heard. For comparison the best low-end extension I could find from any reputable 4” in-ceiling is down to 90Hz and by using the SA4-66 you can have the same visible impact and deliver down to 35Hz with great tonal balance and quality.
So, for the times when aesthetics is key, but you still need to deliver quality sound, I think the Sonance SA4-66 delivers as promised and provides a good balance of both. In the custom installation market, we’ve all had the “I don’t want to see anything on the ceiling” client or designer, and this gives you one more option in the bag to keep that client happy.
Manufacturer: Sonance
Distributed by: Amber Technology
-
ADVERTISEMENT
-
ADVERTISEMENT
-
ADVERTISEMENT
-
ADVERTISEMENT