
Review: Fujifilm FP-Z5000 projector
Fujifilm, a company best know for its digital camera technology and lenses, has released its first projector and it’s a doozy. Stephen Dawson reports.
Generally one has to carefully choose a signage projector to fit a particular application. But thanks to what is, in effect, a built-in periscope, the Fujifilm FP-Z5000 is so fl exible it can replace a dozen other models.
What it is
In short, the Fujifilm FP-Z5000 is a full HD, single-DMD DLP projector, fitted with a long-life laser diode lamp. Oh that, plus the incredibly flexible lens which lets it project its image in all kinds of different directions. We shall return to that because it’s worth dwelling on. But first, the other stuff.
ADVERTISEMENT
The 0.65’ digital micromirror device offers the usual consumer resolution of 1,920 by 1,080 pixels. That’s a wiser choice than WUXGA since it avoids oversized splash on common 16:9 screens and matches the majority of computer displays. Plus, of course, consumer sources.
Backing this is a laser diode light source. That gives the projector a long, relatively service-free life of 20,000 hours. That works out to more than 2,500 eight-hour days of operation, or nearly seven years. It’s rated at 5,000lm output. In combination with the DMD it achieves a contrast ratio of 12,000:1. Those figures clearly fit it to a wide range of installations, including those with fair amounts of ambient light.
Laser diode light sources also allow more placement flexibility than conventional lamps, many of which require the projector to be kept horizontal.
There are three HDMI inputs and one HDBaseT input. The HDBaseT and two of the HDMI inputs are at what I’ll call the back of the projector, while the other HDMI input is on the side, allowing some wiring flexibility. The power cable socket is next to that third HDMI input. Also at the back are a USB socket and a mini-USB socket. The latter is for firmware upgrades. The former is to provide power to any accessories that may require it, such as wireless receivers.
There’s a 10W amplifier and speaker built in, but I doubt that’ll receive much use in typical installations.
The projector supports computer-type signals up to WUXGA at 60Hz. (Although one should try hard to set a 1,920 by 1,080 output resolution for maximum clarity – those slight rescalings can really soften text, making it hard to read.) And it supports consumer-style 720p, 1080i and 1080p at both 50Hz and 60Hz. For some reason the specifications don’t mention 24Hz, but I can confirm that the projector does work with this standard movie frame rate.
Flexible lens
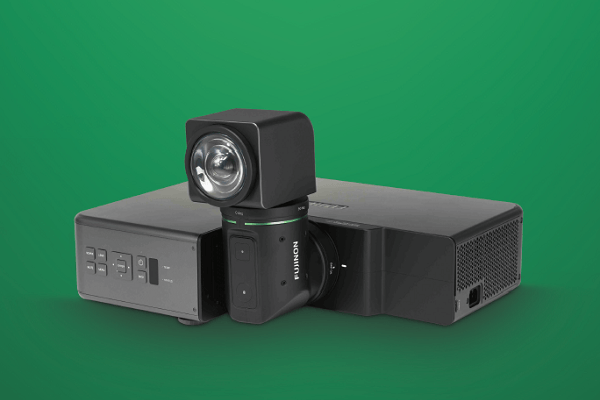
What really sets the Fujifilm FP-Z5000 projector apart – and this is presumably what contributed to its recent exhibition scoring second prize in the ‘DSJ – Digital Signage Japan 2019 Booth Award’ – is the articulated lens assembly.
The DLP engine projects the light forward in a more or less conventional manner. But instead of the straight-through lens the light encounters a mirror that redirects it by 90°. Then after a few centimetres it is turned by another 90° by another mirror. Then it finally emerges from the outer lens. Within there are undoubtedly more lenses. You can trust the optics. Fujifilm has a specialist lens arm, Fujinon, known not only for its projector lenses, but also its camera and cinema camera lenses.
The front lens is quite bulbous because the projector is a fairly shot throw unit. To fill a 100’ screen the projector must be between 0.75m and 0.82m from the screen. That has clear advantages in commercial placement. Although the zoom range is modest – 1.1:1 – there’s a wide-ranging lens shift available, both vertical and horizontal, allowing the projector to work from a significant off set from the screen.
In its most conventional arrangement, the arm of the lens assembly stands up from the body of the projector and the image fires forwards. But the top section can be rotated to positions 90°, 180° and 270°. Or when the lens arm is folded down, the head can be rotated to three effective positions: straight ahead, up or down. So, with one orientation of the projector, the image can be sent in six different directions, and from two different positions in the case of the image going directly forwards.
As I said, very flexible. There is one final position: that’s with the arm down flat and the lens pointed towards the body of the projector. That’s its storage position.
Setting up
The projector comes with a slim ‘Basic Manual’, which covers installation and the basics of using the projector.The main operating instructions are online and are, irritatingly, a multipage HTML document, not a downloadable PDF. Tough if you find yourself offline and need to look something up.
Nonetheless, the projector is straightforward in setting up. Well, it was once I turned it on. It turns out that the unlock buttons to allow the lens assembly to be swivelled up and turned around only work when the projector power is on.
While still quite short it throw, this one wasn’t very difficult at all to get right and to line up with the borders of my screen.
I’ve outlined above how the lens can be placed. The projector itself can also be placed desktop style, ceiling mounted or stand up vertically. Brackets with fold-out legs are provided for this last placement. These give the projector a wider footprint so it doesn’t topple.
In addition to lens shift, there is also keystone adjustment. As always, this is best avoided if at all possible because it wastes projector resolution.
The movement of the lens into position is manual, but all the conventional adjustments are powered. That is, you use the remote control (or the unit’s own control panel) to adjust lens shift, focus and zoom. You can disable all the on-body controls, including the lens release buttons, in the menus.
One particularly clever feature is a kind of autoseek one. The projector automatically uses lens shift to try to get its projection onto a nearby screen at which the lens is (roughly) pointed.
I usually shudder a little when it comes to setting up a short throw projector. They are often very finicky, with a millimetre here or there introducing market trapezoidal distortion. While still quite short in throw, this one wasn’t very difficult at all to get right and to line up with the borders of my screen.
I set the focus for the middle of the screen and it was possible to see the pixel boundaries – standing up very close, of course; not from any reasonable distance away – all the way into the corners of the screen.
The lens assembly both looks and feels solidly constructed. There was very little movement once it was locked into a position.
In use
In recognition of this projector’s likely uses, I ran it mostly under the full glare of the two fluorescent tubes in my office. The image the projector cast was nonetheless clear, bright and colourful. That was with the out-of-the-box ‘Bright’ image setting. This had a slight green caste which seemed to produce a natural looking colour balance under those tubes. Fluorescent lights tend to produce a greenish light, so the green caste of the projector balanced out what I call the human eye’s ‘auto white balance’.
But once I turned off the lights, the green caste was evident, making greys look a trifle sickly and generally softening the intensity of all the colours. So in a darker environment, or where an ambient lighting is a more natural colour, it’s best to choose a different picture mode. The other options are ‘Standard’, ‘Cinema’ and ‘sRGB’. ‘Standard’ gives the most neutral result. All were just a little hot in the blacks, at least in a darkened room. I found it best to knock the ‘Brightness’ control down from 50 to 48 for ‘Standard’ mode.
The rainbow effect was barely noticeable, even when I had the projector delivering black and white test patterns to the screen. It’s unlikely to be bothersome in that regard to members of the public. I did see some quite obvious rainbow effect on the lens itself when viewed from the side. Because it is rather bulbous, the front of the glass is clearly visible. However, few people are likely to be looking at the projector itself.
The cooling fan produces rather more white noise than I’m used to, but since I mostly review home theatre projectors rather than commercial ones, that’s not surprising. In an area with public traffic, what’s noticeable in a quiet office is unlikely to draw attention to itself.
Conclusion
It’s highly versatile placement options are part of what makes the Fujifilm FP-Z5000 projector well worth looking at. The long-life laser LED light source is another. I can see this being perfect for many installations.
-
ADVERTISEMENT
-
ADVERTISEMENT
-
ADVERTISEMENT
-
ADVERTISEMENT