Optoma P1 UltraHD Projector
The new P1 projector from Optoma addresses many of the most enduring challenges associated with front projection, writes Stephen Dawson.
One of the main problems with front projectors is that most need to cast their image across a room. And that means whenever someone stands up, they cast a shadow. Another of the main problems is that you need some other smart component to provide today’s digital fodder. The Optoma P1 UltraHD projector fixes both of those problems.
What it is
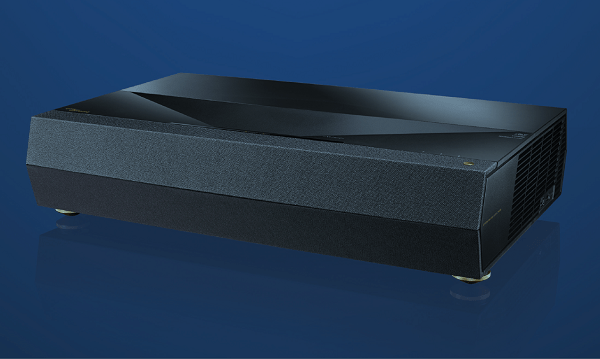
The Optoma P1 UltraHD projector is, as the name suggests, a projector capable of delivering a 3,840 by 2,160 pixel UltraHD image onto a large display screen. It is an ultra-short-throw unit and also incorporates networking technology with smart functions.
ADVERTISEMENT
On the Australian website for Optoma, the ‘Display Technology’ of the P1 is identified as a ‘DLP 4K UHD chip’ and the ‘Native Resolution’ as ‘4K UHD (3,840 × 2,160)’. None of that helped me determine which DMD chips this unit employs. I am pretty sure that Texas Instruments has not yet released a consumer-level native UltraHD DMD out into the wild. With my UltraHD test patterns, the output looks a lot like that typically produced by UltraHD projectors using the 0.47” 1080p DMD with 4x XPR pixel shifting. In the absence of specific information, that’s what I’ve assumed in this review.
As is the norm for ultra-short-throw projectors, this one is wider than it is deep or tall. A top-mounted outlet casts the image up at the screen. For a 100” (2.54m) image, the projector is located with its leading edge just 256mm – 10” – short of the screen.
Optoma rates the output at 3,000 ANSI lumens and the contrast ratio at 1.5 million to one. The light source is a LED laser unit, rated at 20,000 hours life.
The two HDMI inputs both support UltraHD signals and the proper HDCP copy protection.
And then there’s the network connectivity. There’s an Ethernet socket, but the unit will also connect to WiFi networks. That’s what I used. There’s a smart interface with apps for things like Spotify, Netflix, Amazon Prime and quite a few other content sources. It wasn’t clear precisely which OS was in use. I’d guess Android, but there are plenty of others that are based, like Android, ultimately, on Unix/Linux.
There are also a couple of USB sockets from which you can play media, or you can use them in the ways normally implemented in smart TVs. For example, I plugged in a Logitech keyboard wireless dongle and could then use the keyboard to enter search terms and passwords, and the mouse to navigate. The web browser app especially benefitted from this.
Watching
Earlier I said that with ‘my UltraHD test patterns, the output looks a lot like that typically produced by UltraHD projectors using the 0.47” 1080p DMD with 4x XPR pixel shifting’. A lot indeed, but not exactly like them. It looks to me that this projector does the cleanest job of any of those models producing UltraHD resolution. When I projected the test pattern, in which both horizontal and vertical lines are on and off, UHD pixel-width by pixel-width, I could see the lines clearly displayed with no real mushing up.
Again, compared to an UltraHD TV, things were a little softer, but not by very much. I think with the Optoma P1 projector, UltraHD projection via DLP with 1080p/XPR chips has come of age.
Which is not to say that it is entirely without problems. There were two: one to do with the projection geometry, and one to do with frame rates.
First, projection geometry. With the projector placed at the foot of a perpendicular screen, the resulting image was impressively square. But not perfectly square. In particular, it bowed up at centre top a little, perhaps by a centimetre on the 80” projected image I used.
Naturally, I decided to check out the de-warping feature. This was easy to use. You just select the area of the boundary you want to adjust on the test pattern, then use the arrow keys on the remote to move it. I dragged down centre top by a centimetre, and that was it.

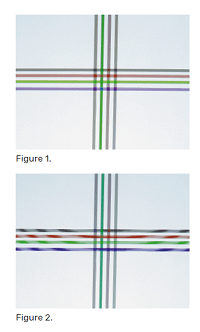
But this is not an optical adjustment, it’s a digital one. And that means that the input pixels are remapped to the output pixels. You can see the effect that has on my test pattern. Figure 1 is a photo of the screen with the slight bow showing at the top, and a clean pattern. Figure 2 has the bow corrected, but the clean separation of the horizontal lines no longer exists. Now there are moiré-like patterns along them.
On the example, these patterns appear only on the horizontal lines because I adjusted the warp only in the vertical direction. They would appear on the vertical lines if there was any horizontal adjustment. In a sense, it’s like a fancier version of keystone adjustment, so when you use it you lose some resolution and potentially gain some artefacts.
In the real world of movie watching, you’d have to be extremely unlucky to see this kind of pattern which, after all, was due to an interaction between a regular crosshatch test pattern and the pixel structure of the display. But if you’re a purist, you may object.
The slight warp isn’t particularly objectionable, and is only noticeable when comparing the edge of the projected image with the frame of the projection screen. If I were setting it up in my office for simple, long-term viewing, I’d leave the warp adjustment off and set up so that it slightly overscans the projection screen, making that more apparent edge effect invisible.
The other potential problem has to do with frame rates. It’s clear that the projection engine runs natively at 60 frames per second. That upsets the cadence of 24fps, 25fps and 50fps content. With 24, for example, the frames have to be presented as AABBBCCDDDEEFFF. You can see the resulting jerkiness. That’s even more apparent with Australian-style 25 and 50fps content. The latter, for example, is delivered as ABCDEEFGHIJJ.
But the Optoma P1 incorporates a multi-level motion-smoothing system. This interpolates new frames to insert between the incoming ones. At its two higher levels, it also tends to introduce visible distortion. These would seem to generate two or three frames between the incoming 24fps frames. Motion was extra smooth, but it’s best to avoid the distortion.
But the default level of ‘1’ seemed to avoid any distortion, and not only smoothed motion significantly, it also did a good job of eliminating those cadence problems – since it’s converting to 120fps instead of 60, it has more options for distributing the frames.
I did notice a slight unevenness in pans during cricket games broadcast on HDTV, but only when looking for it.
Still on the subject of 50Hz signal handling, the projector did a so-so job of deinterlacing 1080i50 and 576i50 content. It seemed to flick between video and film handling quite a lot, so artefacts would flash into and out of existence.
Which means, for best performance you should use a source with good internal deinterlacing, or perhaps run the signal through a home theatre receiver with strong performance in this regard.
But what was impressive was the scaling of 720 by 576 pixels up to 3,840 by 2,160 pixels. PAL DVDs looked clean and quite watchable, despite the display size.
Of course, UltraHD material looked best of all. The colours were extremely rich and seemed accurate. Black levels were convincing, in the sense that they were subjectively full black. Importantly, there was no apparent banding of colours or grey-scale levels. The projector clearly supports 10-bit video.
But there was some odd behaviour with colour resolution for signals fed viaHDMI. My UltraHD test pattern consists of groups of black lines, red lines, green lines and blue lines. When these patterns were fed via HDMI, all but the green ones came out as black rather than coloured. Initially I thought that perhaps the projector was somehow rejecting 4:4:4 colour, but its info screen reported that’s precisely what it was receiving. Furthermore, I’ve designed the test pattern so that even if the colour resolution was merely 4:2:0, some of the lines should have come up red and blue. I used two different UltraHD players to stream the test pattern and the result was the same. I tried pulling down colour bit depth to 10 then 8 bits, but it made no difference. I tried using RGB colour format instead of component, but again no difference.
I confirmed that the test pattern was properly displayed by my LG OLED TV. So I’m left bemused about this.
Especially as I used the projector’s smart network features to play the same test pattern, delivered via the network, and it was delivered with full colour resolution that way.
I’d completely neglected to look for the rainbow effect for some reason. I was only reminded of it after a couple of weeks of fairly heavy use when my eyes slid across one of my test patterns and I briefly glimpsed it. I’m rather sensitive to these rainbows, so that was a very impressive performance. It’s unlikely that most people will ever see the rainbow effect with normal content.
Audio
I did not spend much time on the built-in speaker system. It certainly sounds enormously better than any projector speakers I’ve heard before sound. But, come on, really? The Optoma P1 projector produces a magnificent picture to a huge scale. This deserves to be accompanied by an audio field to a similarly huge scale. Stereo from the front just isn’t going to cut it, especially since by the standards of stereo systems the built-in one is fairly ho-hum.
Optoma hasn’t implemented what I would have thought the most useful application of the built-in speakers: allowing them to be employed as the centre channel speaker in a surround system. It would have required only a dedicated centre channel analogue input.
In my reviewing room, the projector occupied a position blocking the centre channel speaker, so I reconfigured the audio system to two front channels only, leaving the centre as a phantom channel.
The smart features of the projector include a media player. This was very competent, happily playing just about all the video and photo content I threw at it. It also handled the regular audio formats, including FLAC up to 96kHz sampling.
Finally, the unit supports automatic lip sync adjustment when the HDMI input is used. But for some reason it set the audio delay to 72ms, leaving a significant gap. I changed it manually, and found that a setting of around 325ms – that’s a massive delay – was required.
Conclusion
When I’m reviewing projectors, I’m often torn. I like the bigger picture, compared to my 65” LG OLED. But I find the colour and contrast sufficiently weak on the projector, compared to that TV, to impel me to return back to it.
But not so much with this projector. The colour and contrast really were convincing.
-
ADVERTISEMENT
-
ADVERTISEMENT
-
ADVERTISEMENT
-
ADVERTISEMENT

