
How to connect banana plugs
You’ve probably heard the term ‘banana plug’ and wondered what it is and how to use one. A banana plug one of several methods used to terminate your speaker wires.
The plug consists of a cylindrical metal pin about 25mm long, with a diameter of 4mm, which can be inserted into a matching 4mm socket to make an electrical contact.
The pin has one or more lengthwise springs that bulge outwards slightly. These press against the sides of the socket, improving the electrical contact and preventing the pin from falling out.
ADVERTISEMENT
The wide end of a 4mm plug often has a 4mm hole drilled in it, either transversely or axially, to accept the pin of another 4mm plug. This type is called a stackable 4mm plug.
Some believe the plug improves the electrical connection between the speaker wire and the component it’s connected to.
Further, it greatly enhances convenience during installation. Typically, the back-end of a receiver isn’t all that easy to access, especially when it comes to unscrewing 10-14 binding nuts, adding copper to each one, being sure to keep the conductors separate, then screwing all the nuts back in.
It’s true installing banana plugs can take a little bit of time, but it’s much easier and can be done from the comfort of your couch.
A banana plug isn’t all that complex of a mechanism, but there are different designs of banana plugs that require different methods of fastening speaker wire to them. For this guide, we are using a set-screw plug, which uses two small screws to secure the speaker wire to the barrel of the plug.
First, separate the end of the speaker into two individual conductors. Then, use wire strippers to remove about 1cm of the shielding around the copper.
Some speaker wire has a thin casing wrapped right around the wire, if yours does make sure you get that off, too – you want pure copper exposed.
Next, twist your wire in one direction – you ideally want to create a tight bunch of wires. Unscrew the cylindrical outer shell and remove it from the plug. You should now see two screws on opposite sides of the plug.
Using a small flathead screwdriver (as seen in most mini-screwdriver of eyeglass repair kits) loosen the screws on both sides of the plug while ensuring not to completely remove them. Fit the twisted wire in the shaft of the plug; if you have any copper exposed trim it down so that all the copper is protected by the plug. Then, tighten the two screws so they are flush with the barrel of the plug.
Finally, replace the cylindrical shell.
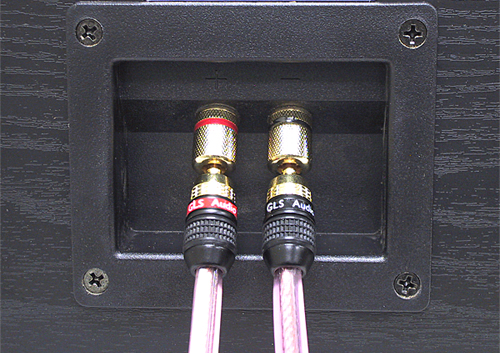
You should have noticed you have one red and one black plug. These colours indicate polarity, so you need to be consistent in how to match these up with the wire. Generally speaking wire is only printed on one side so try and keep all the marked cables on the positive or negative sides. Failure to do so will lead to the speakers being out of phase.
Once you have finished your terminations, it’s time to make some connections. For your speakers and receiver you want to make sure your binding post nuts are closed tight, otherwise your plug may not fit into your post properly.
Most speaker terminals are marked red and black, as is the case with receivers. Some receivers use different colours for the different channels in your zone but in all cases will have a black ‘negative’ terminal.
Once the plugs are connected just sit back and enjoy your audio experience.
-
ADVERTISEMENT
-
ADVERTISEMENT
-
ADVERTISEMENT
-
ADVERTISEMENT