
The trouble with overscanning
In many cases your TV screen doesn’t show the whole picture, although these days it should.
The history of consumer television has been a proud one indeed, leaving us, now in 2011, with astonishingly classy performance from quite modestly priced TVs. But getting to here has taken considerable ingenuity from engineers, largely in adding new features while preserving backwards compatibility.
For example, the great challenge in colour broadcasting was not in doing it at all, but in doing it in such a way that black and white TVs still worked.
ADVERTISEMENT
Unfortunately, at least one practical solution to a past problem is still with us, even though it has largely outlived its usefulness. And that problem is overscan.
A typical TV would, in effect, scale up the picture by 5% and then chop off the edges, as seen in the second frame. Clean edges were the result, at the cost of the loss of generally unimportant stuff at the edges.
What is it?
Overscan is a way of presenting video on the screen at a size that is perhaps 2% to 5% too big for the screen. The result is that the edges of the picture cannot be seen; they overflow off the visible screen area.
This process dealt nicely with some problems in the olden days of analogue TV. Remember, a picture used to be transmitted as a continuous streaming radio wave, modulated to represent a series of lines scanned horizontally across the picture. The TV had to decode these, divide up this continuous line into the segments representing the scan lines, and then display them suitably aligned on a cathode ray tube TV.
In Australia’s analogue TV system there were 625 scan lines for each frame and 25 frames per second. Each scan line had a duration of just 64 microseconds, and the part of each carrying the picture was only 52 microseconds (the difference of 12µs was called the ‘blanking interval’). At the TV, electromagnets were used to control the direction of a beam of electrons squirting down the length of the TV tube. They would trace a horizontal row from one side of the screen to the other, and then when they got to the end, they would be switched off and the magnets would drag the gun rapidly back to the starting side of the screen for the next row. The blanking interval allowed enough time for that.
Now, imagine you have a ball of string, a 30cm ruler and a pair of scissors. If you try to cut several hundred 30cm lengths of string by measuring each segment using the ruler, there will be small variations in their length. Stack them neatly and the edges will be wobbly due to the different lengths.
And so it was with CRT TVs. Even though there were various synchronisation signals (the blanking pulse, for example), in the early days it was a rare TV that could align all the scan lines to perfection. The result was raggedy edges to the left and right of the picture.
It wasn’t just the left and right edges that were the problem: so were the top and bottom. While there were 625 horizontal scan lines, only about 585 of them made up the picture. The other 40 lines was a vertical blanking interval to allow time at the end of each frame (I’m simplifying here, as each frame consisted of two fields) for the electron gun to realign from the bottom of the screen to the top. This took about 2.5 milliseconds.
If all this seems like an awful lot of wasted signal, you should remember that these standards were developed to cope with the relatively wide tolerances involved in mass production in the 1940s. Later, some of these empty scan lines were employed for other purposes: two of them were encoded with data that formed teletext, for example.
Once again, a sync signal was included in this empty space, but the electron guns in CRTs could drift and lose the ability to deflect the electron beam widely. A common-enough sight in my childhood was to see older TVs with black bars at the top and bottom of the screen as the vertical height of the picture gradually narrowed.
These days, with bitmapped digital displays, we are used to perfect picture geometry. With CRT TVs, trying to achieve good picture geometry was a large part of tuning the picture.
The obvious solution to these problems – raggedy left and right edges to the picture, and possible black bars at the top and bottom – was overscanning. This pushed the ugliness off the actual viewable part of the screen, giving a full picture and nice crisp edges.
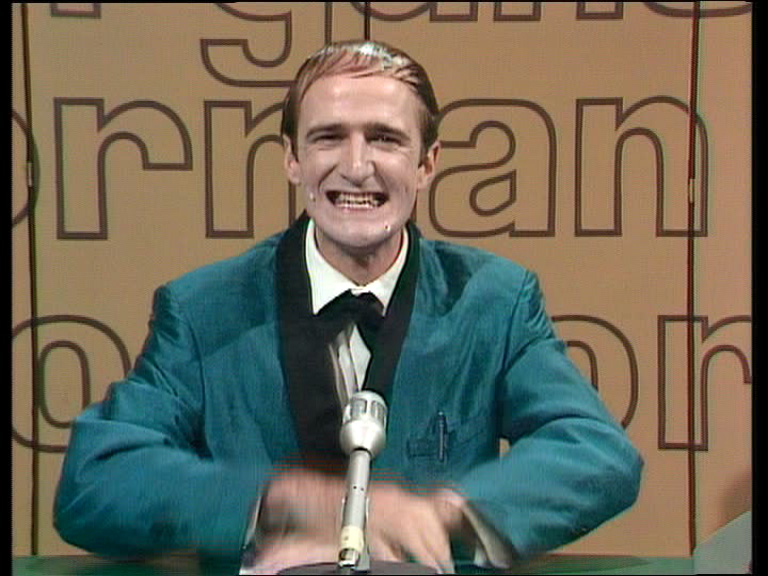
This process is shown in the two Norman Gunston frames on this page. The first I took directly from a DVD, but which actually originated as an analogue TV picture in the 1970s. You will see that there are black bars to the left and right and a narrower one at the top. In addition, at the picture reaches all the way to the bottom on the left hand side, falls one scan line short in the middle area, and two scan lines short at the right side.
A typical TV would, in effect, scale up the picture by 5% and then chop off the edges, as seen in the second frame. Clean edges were the result, at the cost of the loss of generally unimportant stuff at the edges.
We’ve come a long way
Of course, come 2013 analogue TV will be completely dead in Australia when it comes to broadcasting, and CRT TVs are becoming increasingly rare. Instead of transmitting a wavering continuous analogue line representing a sequence of analogue scan lines, TV transmissions (and DVD and Blu-ray video) are handled as a series of frames constituted by a bitmap of pixels. These are encoded by a compression algorithm – then in the case of digital TV, sent over that wavering broadcast signal – but then reconstituted into their original picture frame format. And that’s how they appear on your screen. There are no scan lines as such any more.
If the TV station (or movie maker) wants crisp clean edges to the picture then all they have to do is make sure that the picture entirely fills the frame.
But in the world of consumer TVs, the practice of overscanning continues. Sitting on my test bench at the moment is an absolutely gorgeous 2011 65 inch Panasonic plasma TV. Full high definition, 3D built in, by default it has overscanning switched on, even for HD digital TV.
Why would they do that?
Well, because a lot of content is made on the assumption that it will be shown on a TV that overscans, and so has been created with black borders to make sure that most of the picture ends up in the visible part of the screen. See the frame grab from the DVD of Amelie on this page, for example. You can see that there are vertical black bars to the left and right of the picture. These account for about 2.5% of the total picture width, and are there solely to keep more of the picture on the visible part of the screen. On the Blu-ray version of this movie, the picture stretches from the very left hand pixel to the very right hand one, edge to edge.
Overscanning losses
These days, overscanning is something that should be avoided wherever possible. The problem isn’t so much that important picture information is lost – most content producers are careful to keep important stuff away from the edges – but that it involves unnecessary processing that can detract from the picture quality, especially with Blu-ray.
Nearly all Blu-ray discs have their main content with a resolution of 1,920 by 1,080 pixels. Most TVs these days have the same resolution. Each pixel on the disc should be transferred to the matching pixel on the TV.
But if overscanning is enabled, the source picture has to be scaled up slightly, typically by 2.5%, sometimes more. That means that a dot that is supposed to be crisply occupying a single pixel on the display has to be smeared slightly into at least three adjacent pixels. This softens the image very slightly, but in some cases can result in noticeable artefacts such as moire patterns and, jittery fine detail.
All decent displays these days have a way of switching off overscanning, although you may have to consult your TV’s manual. On the aforementioned Panasonic TV, for example, it is in the ‘Advanced’ picture menu. Others do it by means of a special aspect ratio setting, such as ‘Dot for Dot’ or ‘1:1’.
With DVDs and standard definition broadcast TV, you may want to leave overscanning in place, depending on the program (some digital TV still has what look like split scan lines at the top and bottom, and sometimes patterns on the bottom row of pixels for purposes which are unclear – see the dot pattern at the bottom left of the newsreader picture).
But for Blu-ray and HDTV, you’re going to get the best picture by switching overscanning off.
-
ADVERTISEMENT
-
ADVERTISEMENT
-
ADVERTISEMENT
-
ADVERTISEMENT