
REVIEW: AVTech TVI HDCCTV system
Security is often an afterthought, but that shouldn’t be the case. Here, Stephen Dawson looks at an mid-range system at an entry-level price.
 Several decades ago I experienced a security video system at first hand. A local business suspected a staff member of pocketing money from the cash register, so he’d set up a closed circuit TV camera to watch the position.
Unfortunately, recording in those days was on video tape. So as a member of the local police Fraud Squad, I spent a couple of days at home (we didn’t have a VCR in the office) watching many hours of the most boring footage imaginable.
ADVERTISEMENT
Things have come a very long way since then.
What is it?
Altronics, the Perth-based electronics retailer (it also has stores in Sydney, Brisbane and Melbourne), has a wide range of CCTV systems available. This AVTech range is its newest, providing full high definition (i.e. 1080p) video in analogue format, although with digital recording and digital control systems.
There are a number of models in the lineup, most of which are conceptually the same, so I’ll be focusing here on one system consisting of the S9355C digital video recorder and the SA9137F IR bullet camera.
The S9355C is a 16 channel model (that is, you can plug up to 16 cameras into it) and also provides sound for four channels. The S9354C is an eight channel model, while the S9353C offers four channels. These units offer a number of features which we’ll get to shortly, but among them is camera control of motorised models. However the IR bullet camera supplied for review is a fixed model, so this didn’t apply.
As suggested, this is a hybrid digital and analogue system. An analogue video signal is generated by the camera and sent down the cable to the digital video recorder/interface. There it is digitised and can be recorded on an internal hard disk drive or otherwise dealt with as digital video.
On the analogue side, the system uses the TVI standard, which stands for Transport Video Interface. This provides improved cable run lengths and tolerances over the previous analogue high definition standard, HD-SDI. The DVR and camera both support 1080p video.
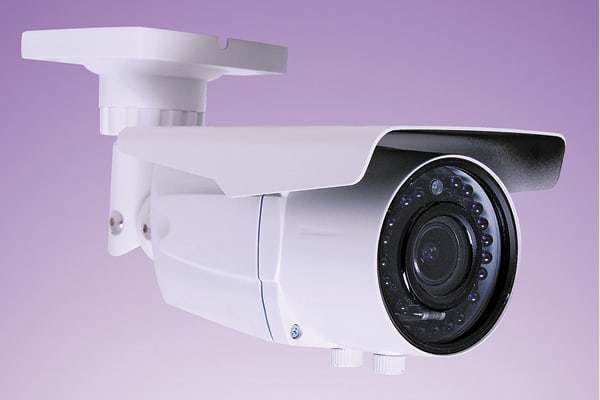
The camera is IP66 rated for weather (basically, it will cope with anything the outdoors has to offer), and comes with an adjustable mount and a sun shade to eliminate glare. It also has a ring of 36 infrared LEDs around the lens for night use.
So, why HD?
Well, if you want to see that register jockey stuffing money into a pocket, detail helps. Solving crime, and consequently deterrence value, works best if perpetrators are identifiable. Higher detail can also provide economy since fewer cameras may be needed. Full HD (1920 x 1080 pixels) provides a little less than four times the visual information of the 960H standard (960 x 582 pixels).
The TVI standard is said to be good for cable runs of up to 500m. That means that there will be no problems with wiring up a typical home. The signal cabling required is standard RG59 coaxial cable. 12V of DC power is required, so in many cases ‘Siamese coaxial’ is used, with a twin core conductor for power fused to the RG59, allowing effectively a single cable run to each camera.
The DVR comes bare-bones. That is, while there are three bays inside for hard disks, it is unpopulated. Hard disks are cheap these days so you can load it up for a great deal of recording, or just go with a single one. They are user-installable. You just remove the lid, slide the hard drives in to make a firm join to the connector, and then tighten the two spring-loaded thumb-screws for each drive to secure them.
The output from the DVR is HDMI at full high definition resolution. The unit connects to your network via Ethernet.
Setting Up
Installation consists of two parts: one difficult, one easy. The difficult part is all the physical stuff: installing cables, attaching cameras to suitable positions and so on.
The easy part is getting the system up and running once you’ve done that. Even though I’m far from experienced with security systems (see above: video tape and VCRs!) it proved to be very simple and took me just 10 minutes to have the thing going and recording. On switch-on, a wizard guided me through the process. This included wiping and preparing the newly installed hard disk drive and configuring the network, including registering an account.
A wired mouse is provided with the unit and this plugs into a front panel USB socket. So running through the menus simply involves clicking on things in the on-screen interface.
Each camera can be configured separately for things like brightness, contrast, sharpness and so on. The supplied bullet camera started out, for whatever reason, to produce a fairly low contrast picture. The setup section allowed that to be fixed.
The camera itself has manual focal length (zoom, if you like) and focus screws, so with this camera at least you need to set the field of view and focus at that end. That took a little care because there seemed to be around a one second lag between real life and the image appearing on the screen of the TV plugged into the DVR’s HDMI output. That made it easy to overshoot. The trick is to just make small adjustments, once you’re in the rough vicinity of the right settings.
At the DVR you can set things like motion detection. You can have the unit record continuously, at specified times, or only when it detects motion. There are sensitivity adjustments for the motion detection and the ability to mark which parts of the field to which you want the motion detector to react.
Part of the reason for the networking is to keep you informed of what’s happening even when you’re not there. To that end you can install the free ‘EagleEyes’ app to your Android or iOS phone so that you can check from afar. During the main wizard run on the DVR, it invites you use the EagleEyes app to capture a bar code which it displays. This uniquely identifies the DVR to EagleEyes (by its MAC address) so that the app can view its cameras from anywhere.
Furthermore the system can be set to push notifications and video to your phone when motion is detected. This is very clever stuff. If you get an alert while away from home, you can check out what’s going on visually before deciding whether to call the police.
It is for that across-the-internet communication that you need to register the unit.
In use
By default the on-screen image shows the 16 input channels as a grid. You can change this to nine, four or click on a single one to make it full screen. Once you’ve got one up as full screen you can zoom in on particular areas digitally. An easy replay system includes jumping through playback by the hour, or fast forwarding and rewinding at speeds of up to 32x.
That allows you to scan through relatively quickly looking for anomalies. But there’s also a ‘List’ function which kind of bookmarks events, in particular motion detections. Bring up the list and click on these to jump right to the point of interest.
For obvious security reasons, in order to use any of these facilities you have to log onto the DVR with your password. The timing out on this was fast – after about a minute of non-use – and I couldn’t find a way to switch this off or extend the time. Which is probably a good idea. If you forgot to switch the security back on unauthorised people could well change the settings in disadvantageous ways.
The picture quality won’t be winning any awards for cinematography. There was a fair amount of pincushion distortion. But the picture was clear, and worked well even in low light situations. In the dark the IR was good for seeing things several metres away.
Of course, unlike every spy thriller you’ve ever seen, when a camera goes offline (either disconnected from the power or the signal lead), the DVR notices this and starts beeping.
Conclusion
Unfortunately, no system is yet – perhaps never will be – smart enough to distinguish between a cashier standing at a register doing her job, and one standing at a register pocketing some of the takings. But for thorough overall security at a quite reasonable price, along with the ability to monitor things from afar and be alerted when things aren’t quite right, the AVTech TVI HDCCTV system is well worth a look.
-
ADVERTISEMENT
-
ADVERTISEMENT
-
ADVERTISEMENT
-
ADVERTISEMENT