
Netvio JP4 Series
The Netvio JP4 Series aims to get digital video all around the place at remarkably long distances. Stephen Dawson looks at how it stacks up.
Getting digital video around the place, even over remarkably long distances, is the job of the Netvio JP4 Series AVoIP System; as it says in the name AV–over-IP. Obviously, not the actual internet, of course, but over network wiring within a building.
ADVERTISEMENT
What is it?
The Netvio JP4 Series AVoIP System consists of four types of devices. You’ll need at least one of each of the four device types, and almost certainly more than one of a couple of the types.
In old-fashioned terms, it consists of one or more transmitters, one or more receivers, one switch box and one controller for the whole system. The transmitter(s), receiver(s) and controller are all connected to the switch box – it’s really a rather large network switch – via Ethernet cables. Long ones if necessary.
Typically, you’ll connect each source device – a Blu-ray player, games console, set-top box, etc. – to a transmitter via HDMI. And you’ll connect each display device – your TVs – to a receiver. You can then play any device to any TV, or any group of TVs.
Well, not so much you, since you’ll probably be the installer. Initially, I thought that this kind of system might be primarily for commercial use – advertising displays in malls, and such. And although it can be used as such, it’s clear that the UK developers intended it for quality home installations.
But that doesn’t make it a consumer install job. To get the most effective use out of this system, it needs to be set up by a decently experienced installer. It’s not that hard, as we’ll see, but it is a bit too complicated for most end users.
But once an installation is set up, source-to-display connections can be easily made by the user with the Netvio Go app on Android or iOS.
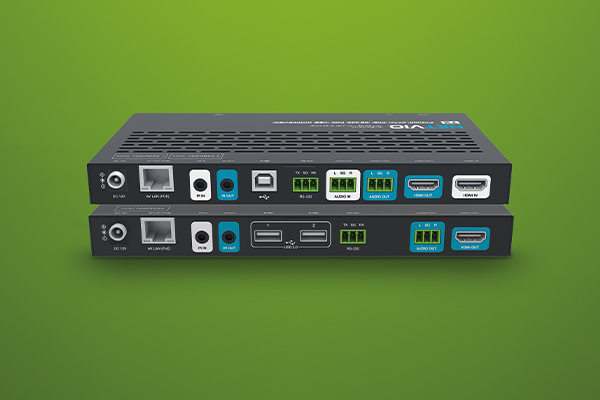
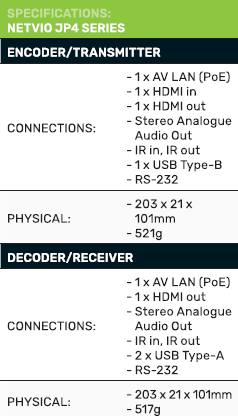
Let’s go quickly through the four types of devices. The first thing to note is that only the network switch needs mains power, although the other units also support 12V of external power, should that be required for some reason. But in practice, the controller, receivers and transmitters are all powered via Power-over-Ethernet (PoE), PoE, supplied by the switch. The transmitters, receivers and controllers all have the same compact dimensions: 203mm by 21mm by 101mm. On the front of each are some indicator lights. It’s on the back that they vary.
A transmitter, in addition to the Ethernet port by which it receives its power and sends its AV signal, has a HDMI input, a HDMI loop output, analogue audio in and out, each via Phoenix connections, an RS-232C serial port (also via Phoenix), USB Type B, and IR in and out connections in 3.5mm. The HDMI loop output is for a monitor for the input signal. I imagine this would only be used during setup for debugging. The analogue audio ins and outs allow stereo analogue sound if you should have some reason for supplying that rather than digital audio over HDMI. Presumably, this is digitised for transmission over the Ethernet cables and converted back to analogue at the other end.
A receiver has HDMI out and analogue audio out, only, plus the IR and RS-232 connections, and also two USB Type-A sockets.
Why have these USB sockets on the transmitters and receivers? Well, you can also use them as USB extenders. This can be particularly useful when the user finds it convenient to have a mouse and keyboard at the display end, connected to a computer at the source end. I’m sure there are other uses for this feature as well.
Both the transmitters and receivers supplied for this review were Netvio’s basic model. These are rated at transmitting 2160p video at up to 4:4:4 resolution in 8-bit colour at up to 30Hz, or 1080p video at up to 60Hz, 4:4:4 and up to 12 bits HDR. Netvio recommends a higher-level version for those interested in high frame rate (HFR) content.
The transmitter and receiver of this version each cost $2,361. They’re capable of delivering 2160p 4:4:4 HDR (up to 12 bits) video at 60Hz. Netvio cautions that the possible HDR to 8-bit conversion of UHD content may result in colour banding. Perhaps. As we’ll see, it wasn’t obvious to me. That said, if finances permitted, in my installation I’d far rather than higher specification models, just to be sure.
There’s no HDMI on the controller. One of the two Ethernet sockets is labelled ‘AV LAN (PoE)’, the other ‘Control LAN’. These plug into dedicated sockets on the switch. There’s also an IR in and an RS232 port, plus another Phoenix-style six-conductor port that looks like some kind of bus.
On one side of the dedicated switch is a power socket and a hard-wired power switch. On the back is a massive bank of 24 RJ-45 sockets. Unlike a regular switch, in addition to delivering the PoE, some of the 24 connections are preconfigured for this particular function. Netvio calls this “Zero-Config”, speaking to the fact that the switch is ready to go out of the box, with no need for any settings to be made. Two of the ports are marked for connecting to the controller, and one – which does not provide power – is for connecting to the home network, by which a computer can gain access to set everything up, and an app can gain access to control everyday use.
The other 21 sockets are for transmitters and receivers! This, I thought, would be more than adequate for just about any conceivable installation. But Netvio actually has a higher model ($5,494) with 48 connections.
While, as I said, the clear intention was for this system to quality routing of AV around homes, it also includes a facility for up to 16 x 16 Video Walls (ie. an array of multiple displays arranged to provide an enormous picture.) Given that amounts to 256 displays, you’d need a bunch of those 48-port switches to connect the lot! I didn’t explore this aspect of the units.
Setting up
As supplied, the equipment had been set up to run a bunch of gear which I didn’t have, so I did a factory reset using the free Netvio 360 software on a Windows notebook (it’s also available for Mac) and started anew.
Now, to be clear, the end user would typically not be employing this software. You use it to identify the overall setup of the Netvio devices, and then you configure the parts of the systems for the equipment – sources and displays – plugged into them. The end user will typically use the Netvio Go app. This allows connections between sources and devices, with minimal other complications.
I found that mostly the Netvio 360 software was well laid out and fairly easy to use, once I’d had a look at a video on the Netvio YouTube channel. There were some aspects that I initially found confusing until I got my head around the way there’s kind of a division of responsibility between two parts of the operating software.
For example, originally, I had merely changed the settings on the installation as supplied, naming the devices appropriately. But when using the Go app, it was still showing the names of the old devices. It turns out that after you make your settings in the Netvio 360 app, you generate a “project” to load into the Go app. I had neglected that step. It’s better practice, anyway, to factory reset and start again. But do remember, the configuration exists in two forms: the software on your computer, which is then installed onto the hardware controller and as a project for the tablet or phone being used as a user interface.
Incidentally, you can access the controller directly using its web interface. This doesn’t seem to be quite as full-featured as configuring using the Netvio 360 software, but makes for a convenient way of making adjustments, potentially remotely when the installer has suitable access.
You can route signals within the software by clicking on connection buttons between the chosen source (shown on the left of the screen) and display (shown on the right). If you’re using analogue audio, you can route that independently of the video.
There is an enormous stack of options provided to configure the system for specific source and display devices. In my use, I’d simply skimmed the surface of the options, but I found that those provided were mostly convincing at a deep level. For example, there are facilities for reading the EDID and applying that data to source devices.
What’s EDID? That stands for Extended Display Identification Data. That’s a little package of binary information that a display supplies over HDMI to a source device during their “handshake” when switched on or connected. It does rather more than identify the display. It tells the source what video it is capable of handling: resolution, colour depth, colour resolution (eg. 4:4:4) and frame rate, and similar for audio, along with preferred defaults. The source can act on that information, down sampling or whatever as required for compatibility.
You can set HDCP – the HDMI copy protection scheme – to 2.x or 1.x. The latter is for older displays that won’t know what to do with 2.x.
If you are using analogue audio, you can set the volume level.
Finally, there are extensive control facilities. You can set devices to talk to each other via HDMI CEC (Consumer Electronics Control), IR and RS-232.
And so on. It’s hard to see anything left out.
In use
Now adopting my end-user role, I set up an iPad with the Netvio GO app. This has to load in a project. There are several ways of doing this. One is for it to import the “published” project from the controller. Or, as was recommended to me, have the Netvio 360 app generate a QR code and then read that using the app. With the latter method, the setup was virtually instant.
The iPad showed rooms for each of the two displays, as well as the two sources. Obviously, it will show as many displays and sources as you have configured. You can load convenient pictures into these – Kordz recommends taking photos of the equipment and rooms to match their connections but notes that a bunch of generic photos are provided by Netvio.
With everything running, all I had to do was drag a source to a room/display on the iPad screen. Either or both. I used a Windows notebook computer as one source and an UltraHD Blu-ray player as the other. Both worked superbly. With the player spinning an UltraHD Blu-ray disk, both my displays were capable of showing the image. One is a recent model LG OLED 4K TV, while the other is a rather old Samsung FHD TV from the pre-smart TV days. Its HDMI features are quite rudimentary. So, I’d set the HDCP on it in the receiver to Version 1.x, and had the box scale the video resolution to 1080p. It worked perfectly, even while the OLED TV was showing the full-resolution version.
Now, the network speed used for AVoIP by this system is 1Gbps. That suggests that some UltraHD content must be at least somewhat compressed. If so, it was not visibly apparent on the LG OLED with UltraHD discs. They looked as sharp and clean as ever. I’d note that I did this viewing before becoming aware of the 8-bit limitation on UHD material. But I noticed no HDR to 8-bit colour banding. Such banding tends to be apparent principally in low-light similar colour gradients. Yet, again, I noticed none.
The first time I had it sent to my computer screen to my 4K TV, the picture suffered a few percent of overscan. That’s the old-fashioned display system where the input signal is scaled up slightly to a resolution larger than the screen, forcing the edges of the picture off the edges of the screen. This hails from analogue TV days when the picture edges were often raggedy. Overscan made the edges sharply defined.
Of course, with digital signals, especially high-resolution ones, and especially, especially, computer display images, you want a precise 1:1 mapping of the signal with the screen pixels. What was happening, though, was easily fixed. I went into the TV settings and switched “Just Scan” (that’s what this is called on LG TVs) from “Auto” to “On”. That restored exact matching. But it’s worth noting because it may be that the Netvio system is somehow tricking the Auto function into overscanning. I fiddled with a few settings but could not make the Netvio stop doing that. It’s possible that I missed it. Just keep an eye out for this when setting up to ensure the best picture quality.
The only other problem I had was due to the disparate ages of my two TVs. The Samsung FHD TV was incapable of handling multichannel audio, playing only the left and right channels from the sound coming via HDMI (which meant, most of time, no audible dialogue). On some discs, there isn’t a two-channel audio selection available. In the end, I used the system to capture the TV’s EDID and then imported that so it was the EDID faced by the Oppo player. That forced the player to mix the multichannel track down to two channels but probably would have limited surround performance on the main system, had I still been using a suitable multichannel home theatre receiver (I’m not, these days I’m strictly stereo).
I don’t expect that modern users will be subjected to this problem since their equipment will typically be more or less same-aged, with similar capabilities. Still, having audio mix-down facilities in the Netvio system (at the RX end), similar to video scaling, could sometimes be a useful feature.
All the devices are physically silent, except for the switch, which was fan-cooled and just a touch whiny. It should be located in an equipment closet.
Conclusion
In my explorations of this system, I switched it on and off several times. And every time, even after I did the factory reset, I’d hit the “SCAN” button in the software (or the iPad app) and the system was found within seconds. There was none of the “will this work?” pregnant pause.
That was how the system worked throughout. It did its stuff without fuss. And once the Netvio Go app was loaded up on the iPad, ready to go, it could not be easier to use. It’s all very impressive.
-
ADVERTISEMENT
-
ADVERTISEMENT
-
ADVERTISEMENT
-
ADVERTISEMENT