
Review: Lumens TapShare TS20-2T1R Screen Sharing System
 It’s difficult when the biggest let down of a product is completely out of the control of the manufacturer. Stephen Dawson looks at the Lumens TapShare TS20-2T1R.
You’re doing a presentation. There’s a screen in the room, and you have your material on your phone or computer. There have long been all manner of ways of getting the image from your phone or computer onto the screen. But what if there are two of you? What if both of you want to show your slides and graphics? The TapShare system allows up to four people to share a screen, and I am reluctant to use the word, but it does seem appropriate… effortlessly.
What it is
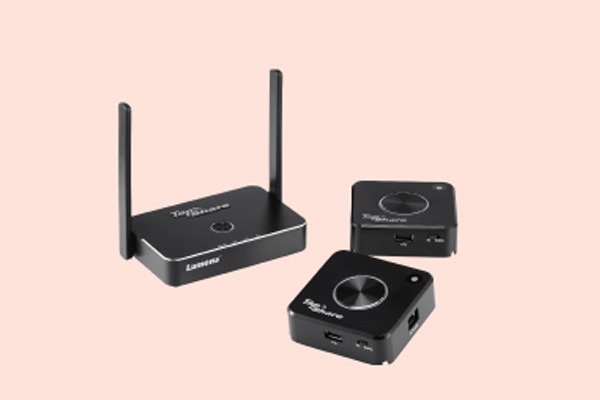
There are two main parts the TapShare TS20 system. There’s the TapShare Box and two or more TapShare Pods. Think of a TapShare Pod as an interface for your device and as a transmitter. The TapShare Box is the receiver, and interface to a display or TV. But it’s a bit more than that.
The TapShare Box allows split screen display of up to four devices, each connected wirelessly to a TapShare Pod.
ADVERTISEMENT
The TapShare TS20-2T1R system comes with one TapShare Box and two TapShare Pods. The other two Pods, if wanted, can be purchased individually.
The TapShare Box is the larger of the two kinds of devices. But it’s still small, at 85mm by 140mm by 25mm tall. It has two WiFi antennae on top, along with some indicator lights and a pairing button. At the back is a power input and switch, a recessed reset button and USB, Ethernet and HDMI out ports. It’s the HDMI port that you connect to the TV or display. It is capable of outputting 4,096 by 2,160p at 24Hz, 3,840 by 2,160p (i.e. UltraHD) at 30Hz and 1,920 by 1,080p at 60Hz. Obviously if you’re sharing one display, higher resolution is better.
The TapShare Pods (80mm by 80mm by 25mm) have an Ethernet connection and three video inputs, plus a kind of USB tail which winds up underneath. That tail is for plugging into any old USB socket to power the Pod.
The three video inputs – you only use one – are MiniDisplay Port, HDMI and USB. Yes, I know, USB isn’t a video input, but this is how it connects with things like iPhones and Android devices for them to share their screens. A small switch on one side chooses between the USB/mobile connection and the main video inputs.
On top are two press buttons with LED indicators built in.
How to use
You plug the TapShare Box into, say, a large screen TV or projector. I used a 65” UltraHD TV, along with one of its USB ports to supply power to the Box. When it powers up, it displays a large, clear screen of instructions.
You plug, say, a computer video output into either the MiniDisplay Port or HDMI socket on a TapShare Pod. You power it up. When the lights stop flashing – perhaps 10 or 15 seconds – you press the main button on top of the TapShare Pod. A few seconds later, your computer’s screen will appear on the TV, replacing the instruction display.
The Pod is sending the screen wirelessly to the Box, using the 5GHz WiFi band. Note, it is not part of your home or business network. It simply uses that band to do its business. But it can be connected to network from time to time to allow things like software updates.
Plug another device into another TapShare Pod and, when things have settled down, press the main button on top of it. The display of the first computer will halve in width and be placed on the left side of the screen. The display from the new device will be displayed on the right side of the screen.
My understanding is that if you have another couple of TapShare Pods, the screen will be quartered.
Pairing
Of course, each of the TapShare Pods has to be paired with the TapShare Box so that they can communicate. That turned out to be fast and easy. I did a full factory reset on the TapShare Box (which is what I normally do with any review device if it has that capability). When it had finished, to pair the two Pods it was just a matter of plugging their USB plugs, one after the other, into the USB socket on the TapShare Box. After a few seconds their various lights stopped flashing, and just glowed white steadily, and it was done.
If your deployment makes it difficult to bring a Pod to the Box, you can still do the pairing remotely. In this case you put a USB stick into the Box, load a pairing file onto it, then place it in the Pods you wish to pair.
You can manage the TapShare Box simply by looking for it as an access point with any WiFi device. Then open a browser and type in the IP address for the unit’s administration page (168.168.168.1) and you can change all manner of settings.
Practicality
I’ll talk shortly about some devices that had problems, but with all the devices that worked, the TapShare system worked in an incredibly easy, intuitive way. Once you’ve plugged everything in, all you need do to display the screen of a device is tap the big button on top of the Pod that it’s plugged into. The red ring will flash for a few seconds, and then change to white, and as it does so the computer’s screen will just appear on the display into which the Box is plugged.
Someone else taps the button on theirs, and theirs appears as well. The first one is always to the left, the second to the right. If you want to change the order, you can just tap out from both, and then tap back in the right way around.
A TapShare Pod looks to a computer like a 1080p display running at 60Hz. When people plug in their phones to display their screens, they need not worry about battery running down because the Pod charges the phone.
There is a slight lag in the display. I’d estimate it at less than a second.
Compatibility
I used the Tap Share system successfully with an iPhone 8, iPad Mini (original model, running iOS 9.x), a Mac Mini (Late 2014 model) and a Microsoft Surface Pro (2017 model). With all four, use was simple and I wouldn’t hesitate to invite honoured guests to plug in and share, pretty much on the spur of the moment.
Android? Hit – possibly – and miss. For me, it was mostly miss. First, to use an Android model, you have to switch on ‘Developer Options’ in the phone. I’m happy enough to do that, but would you encourage your staff or a visitor to do that? Developer Options are kept hidden for a reason.
But let’s say you do. You follow a Harry Potter-like process of going into the system menu of the phone, finding the ‘Build Number’ in the menu and tapping on it seven times. Fortunately, no uttered incantations are required, but you do have to enter the regular unlock PIN for the phone.
I started with my regular Google Pixel 2 XL phone. I followed the process, the other device’s screen shrunk down to the left side on the big TV and room was made available for the Pixel’s display, but nothing appeared. I had a few goes, and did a reboot in there, but it would not work.
So then I tried a Huawei Mate 10 phone. With that one the TapShare Pod didn’t even really detect its presence.
I had more luck with a Samsung Galaxy S7 and a Samsung Galaxy Tab A tablet. In both cases they insisted that “The connected device is unable to access data on this device.” But when I tapped “OK”, the message went away and the devices seemed to work fine. However, unlike the iPad and iPhone, which resized the picture to use the full height of the display when they were in portrait mode, the Android device screens were shown at half height.
I guess I’m sounding a bit down on the TapShare system vis-à-vis Android phones, but I’m actually being down on Android. There are some things in the iOS world which are locked down and made difficult or impossible for the user. And likewise for some things in the Android world. Sometimes they are different things. This is a weakness of Android.
Conclusion
Clearly the Lumens TapShare T20 system is a very easy way for staff and visitors to share a presentation screen with their computers and iOS devices. Android? Sometimes it’ll work. For those where compatibility with Android devices is important should check this out with the distributor.
And I’d note, the system has only just appeared on the market. Don’t be surprised if compatibility improves with firmware updates.
-
ADVERTISEMENT
-
ADVERTISEMENT
-
ADVERTISEMENT
-
ADVERTISEMENT